This requires 3 ingredients:
- A form that you have created in Form Builder (See How do I create a Form? if you need help on this)
- A "form submission received" / "Thank you" page - how-to details below
- A Mintox Forms placeholder on your chosen web page - details below
So once your form is set up in Form Builder, next step is to create your "form submitted" landing page.
Create a "thank you for submitting our form" page
- Add a new page in Web Pages
- Add a message relevant for the end user to see after they've completed your form.
- Example 1 - Thank you for contacting us. We'll be in touch soon.
- Example 2 - Thanks for signing up to our newsletter! Why not stick around and check out our latest blog post? [Link them to your news page here]
- Example 3 - Thank you for submitting our questionnaire. A copy of your answers has been emailed to the address you provided for your reference.
- Save your page as "Hidden" from the Sitemap and Site Search
- Grab the URL of the new page you created.
Add the Form to a page
You can add a form anywhere there's a WYSIWYG editor, so it might be a Web Page, Panel, Item Catalogue item, Product page, Blog post etc.
-
In Mintox, navigate to the content area you'd like to add the form to.
-
Click on an area in the editor where you'd like the form to appear.
-
Click on the insert placeholder icon in the tool bar.

-
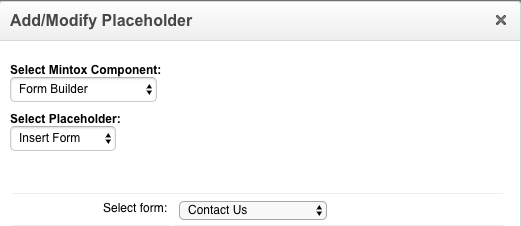
Select 'Form Builder' from the Select Mintox Component drop down menu.
-
Select 'Insert Form' from the Select Placeholder drop down menu.
-
Select the form you want to add on the web page.
-
Populate the 'On completion redirect user to:' field with your Thank You page URL, e.g. /contact-us/thank-you
-
In the 'Email form results to' field add an email address.
-
In the 'From results email address' field add an email address.
-
In the 'Form email subject' field add an email subject line.
-
Then click the 'OK' button.
-
Then click the 'Save and Close' button to save all the changes.
-
Test on front end!
Your form is now live and ready to use! Please always test the form on the website for yourself, to ensure it is set up correctly and that the form submissions are emailed to the right address/addresses. You can check sent emails in the Communication component for quick reference.